Understanding Three.js Materials: From Basic to Physical
Hi 👋, I am Dipankar Paul, aspiring Full Stack Developer with a passion for learning new technologies. Currently, I am learning my front-end development and full-stack development through Apna College Delta. With a passion for creating innovative and user-friendly applications, I am excited to continue my journey in the tech industry.
Welcome back! 👋 In my previous posts, I covered the basics of Three.js and different geometries. Today, I'm exploring materials - what makes objects look the way they do.
If geometries are the shape of an object, materials are its appearance - the colour, shininess, transparency and how it reacts to light. Let's dive in!
What Are Materials?
In Three.js, materials define how the surface of a geometry looks and behaves. They control:
Colour and appearance (matte, shiny, metallic)
Light interaction (does it need lights to be visible?)
Transparency (can you see through it?)
Special effects (glowing, wireframe mode)
Different materials have different performance costs and visual capabilities. Choosing the right material is about balancing looks and performance.
Project Setup
Here's our basic HTML structure:
<!DOCTYPE html>
<html lang="en">
<head>
    <meta charset="UTF-8">
    <meta name="viewport" content="width=device-width, initial-scale=1.0">
    <title>Three.js Materials Gallery</title>
    <style>
        body {
            margin: 0;
            overflow: hidden;
            font-family: Arial, sans-serif;
        }
        canvas {
            display: block;
        }
        #controls {
            position: absolute;
            top: 20px;
            right: 20px;
            color: white;
            background: rgba(0, 0, 0, 0.8);
            padding: 20px;
            border-radius: 8px;
            font-size: 14px;
            max-width: 300px;
        }
        #controls h3 {
            margin-top: 0;
            color: #4ecdc4;
        }
        .control-group {
            margin: 15px 0;
        }
        .control-group label {
            display: block;
            margin-bottom: 5px;
            color: #aaa;
        }
        input[type="range"] {
            width: 100%;
        }
        button {
            background: #4ecdc4;
            color: black;
            border: none;
            padding: 8px 15px;
            border-radius: 4px;
            cursor: pointer;
            margin: 5px 5px 5px 0;
            font-weight: bold;
        }
        button:hover {
            background: #45b8af;
        }
    </style>
</head>
<body>
    <canvas id="canvas"></canvas>
    <div id="controls">
        <h3>Material Properties</h3>
        <div class="control-group">
            <label>Metalness: <span id="metalnessValue">0.5</span></label>
            <input type="range" id="metalness" min="0" max="1" step="0.1" value="0.5">
        </div>
        <div class="control-group">
            <label>Roughness: <span id="roughnessValue">0.5</span></label>
            <input type="range" id="roughness" min="0" max="1" step="0.1" value="0.5">
        </div>
        <div class="control-group">
            <label>Opacity: <span id="opacityValue">1.0</span></label>
            <input type="range" id="opacity" min="0" max="1" step="0.1" value="1">
        </div>
        <div class="control-group">
            <button id="toggleWireframe">Toggle Wireframe</button>
            <button id="toggleEmissive">Toggle Glow</button>
        </div>
    </div>
    <script type="module" src="script.js"></script>
</body>
</html>
Building Our Materials Gallery
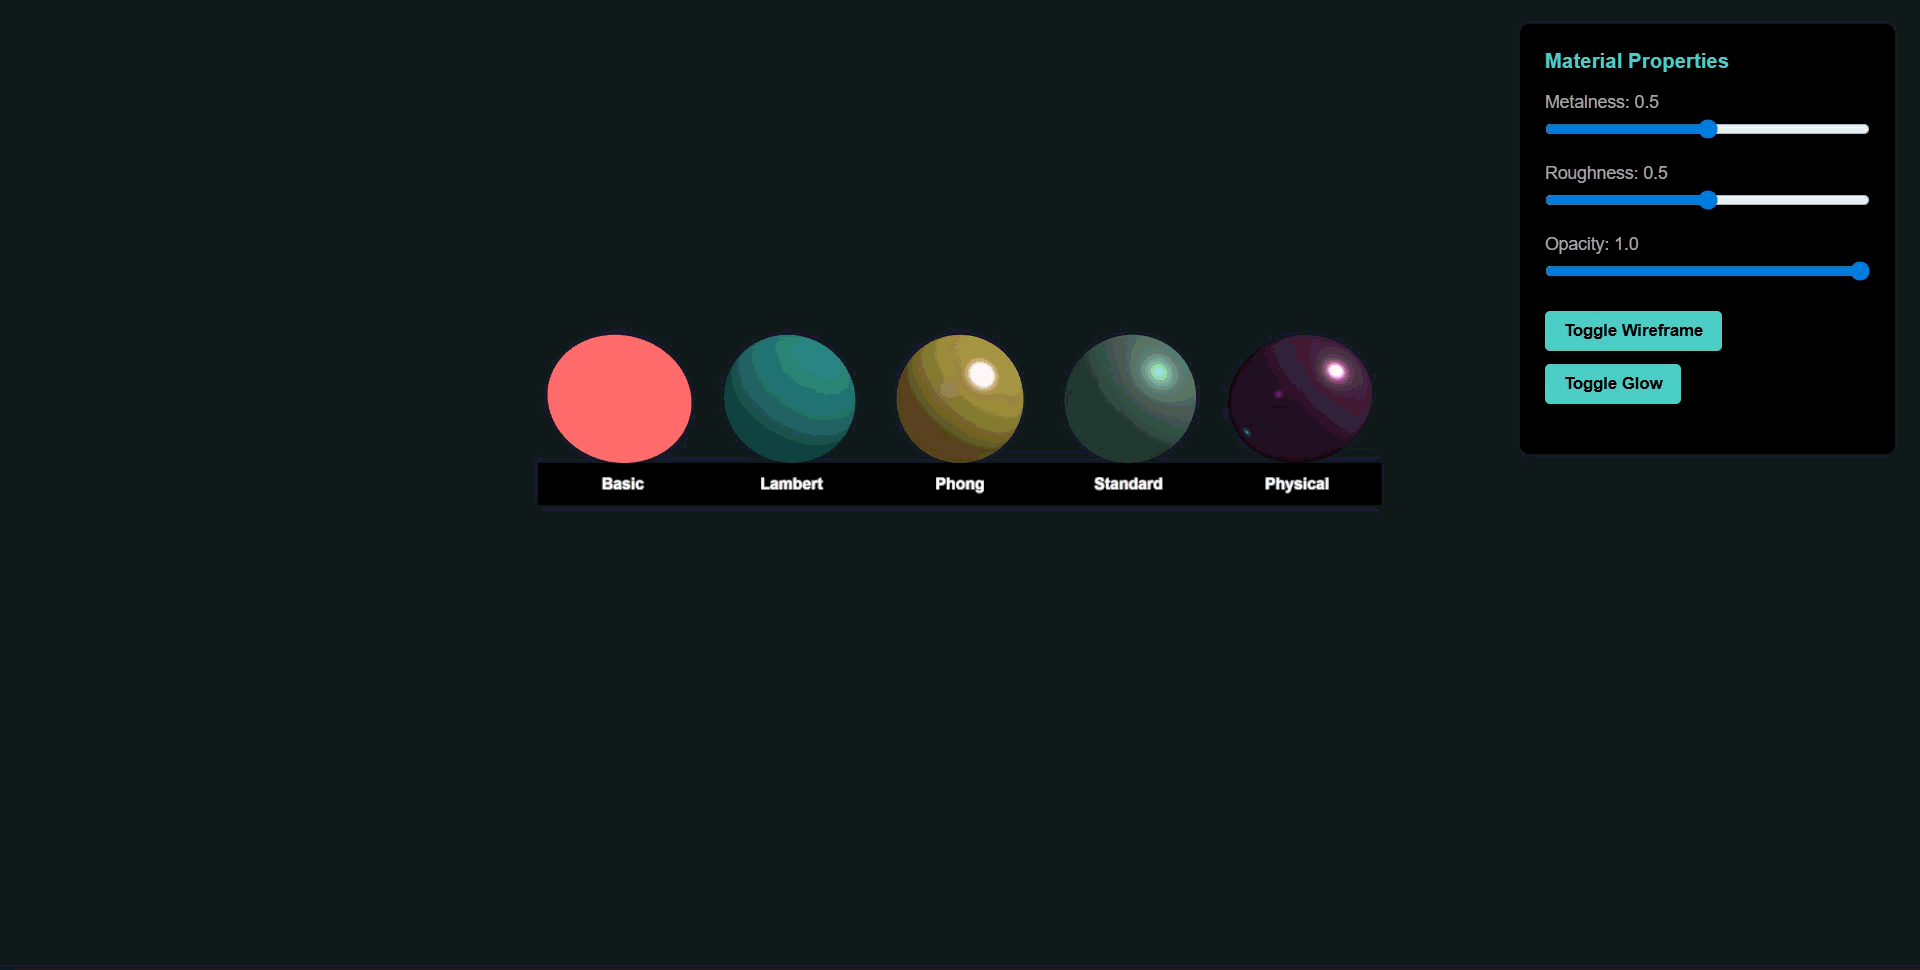
Let's create a scene with the same sphere shape using five different materials to see how they compare!
Step 1: Scene and Camera Setup
import * as THREE from "three";

const canvas = document.getElementById("canvas");

// Scene setup
const scene = new THREE.Scene();
scene.background = new THREE.Color(0x1a1a2e); // Dark blue background

// Camera setup
const camera = new THREE.PerspectiveCamera(
    75,
    window.innerWidth / window.innerHeight,
    0.1,
    1000
);
camera.position.set(0, 0, 15); // Pull back to see all spheres
camera.lookAt(0, 0, 0);
Step 2: Lighting Setup
// Ambient light - base illumination for all objects
const ambientLight = new THREE.AmbientLight(0xffffff, 0.3);
scene.add(ambientLight);

// Directional light - main light source (like sunlight)
const directionalLight = new THREE.DirectionalLight(0xffffff, 1);
directionalLight.position.set(5, 5, 5);
scene.add(directionalLight);

// Point light - adds dynamic colored lighting
const pointLight = new THREE.PointLight(0xff00ff, 1);
pointLight.position.set(-5, 3, 5);
scene.add(pointLight);

// Another point light on the opposite side
const pointLight2 = new THREE.PointLight(0x00ffff, 0.8);
pointLight2.position.set(5, -3, 5);
scene.add(pointLight2);
Step 3: Creating Materials
Now let's create our five different materials!
// ============================================
// 1. MESH BASIC MATERIAL
// Simplest material - NO lighting calculation
// ============================================
const basicMaterial = new THREE.MeshBasicMaterial({
    color: 0xff6b6b,           // Red color
    wireframe: false           // Show as solid (not wireframe)
});

// Use case: UI elements, backgrounds, objects that should
// always be visible regardless of lighting

// ============================================
// 2. MESH LAMBERT MATERIAL
// Matte (non-shiny) surfaces with lighting
// ============================================
const lambertMaterial = new THREE.MeshLambertMaterial({
    color: 0x4ecdc4,           // Cyan color
    emissive: 0x000000,        // No glow by default
    wireframe: false
});

// Use case: Matte surfaces like paper, unpolished wood,
// fabric, chalk. Good performance for non-reflective objects.

// ============================================
// 3. MESH PHONG MATERIAL
// Shiny surfaces with specular highlights
// ============================================
const phongMaterial = new THREE.MeshPhongMaterial({
    color: 0xffe66d,           // Yellow color
    shininess: 100,            // How shiny (0-100+)
    specular: 0xffffff,        // Color of the shine
    emissive: 0x000000,
    wireframe: false
});

// Use case: Plastic, polished surfaces, glossy paint.
// Creates visible light reflections (specular highlights).

// ============================================
// 4. MESH STANDARD MATERIAL
// Physically Based Rendering (PBR) - realistic materials
// ============================================
const standardMaterial = new THREE.MeshStandardMaterial({
    color: 0xa8e6cf,           // Mint green
    metalness: 0.5,            // How metallic (0 = non-metal, 1 = full metal)
    roughness: 0.5,            // Surface roughness (0 = smooth, 1 = rough)
    emissive: 0x000000,
    wireframe: false
});

// Use case: Most modern 3D applications. Provides realistic
// materials using metalness/roughness workflow. Good for
// metals, plastics, and general realistic rendering.

// ============================================
// 5. MESH PHYSICAL MATERIAL
// Advanced PBR with extra features
// ============================================
const physicalMaterial = new THREE.MeshPhysicalMaterial({
    color: 0xffa8e8,           // Pink
    metalness: 0.8,
    roughness: 0.2,
    clearcoat: 1.0,            // Clear coating layer (like car paint)
    clearcoatRoughness: 0.1,   // Roughness of the clear coat
    reflectivity: 1.0,         // How reflective
    emissive: 0x000000,
    wireframe: false
});

// Use case: Car paint, gems, high-quality materials that need
// extra realism. Most expensive performance-wise but most realistic.
Understanding Material Properties
Let me break down the key properties you'll use most often:
Common Properties (All Materials)
Colour - The base colour of the material
material.color = new THREE.Color(0xff0000); // Red
opacity - Transparency level (0 = invisible, 1 = solid)
material.transparent = true; // Must enable this first
material.opacity = 0.5; // 50% transparent
wireframe - Shows the geometry's triangle structure
material.wireframe = true; // Great for debugging!
visible - Whether the material renders at all
material.visible = false; // Hide the object
Lighting-Based Properties
emissive - Makes material glow (like it has its own light)
material.emissive = new THREE.Color(0x00ff00); // Green glow
emissiveIntensity - How strong the glow is
material.emissiveIntensity = 0.5; // 50% glow strength
PBR Properties (Standard & Physical Materials)
metalness - How metallic the surface is (0-1)
0 = Non-metal (plastic, wood, rubber)
1 = Full metal (gold, steel, copper)
roughness - How rough/smooth the surface is (0-1)
0 = Mirror-smooth (polished metal)
1 = Very rough (concrete, rough wood)
Physical Material Extras
clearcoat - Adds a glossy layer on top (like car paint)
material.clearcoat = 1.0; // Full clear coat
material.clearcoatRoughness = 0.1; // Slightly rough coating
transmission - How much light passes through (glass effect)
material.transmission = 1.0; // Fully transparent to light
Step 4: Creating Spheres with Different Materials
// Create base geometry (we'll reuse this for all spheres)
const sphereGeometry = new THREE.SphereGeometry(1.5, 64, 64);
// Using 64 segments for smooth appearance

// Create 5 spheres, each with a different material
const basicSphere = new THREE.Mesh(sphereGeometry, basicMaterial);
basicSphere.position.set(-8, 2, 0);
scene.add(basicSphere);

const lambertSphere = new THREE.Mesh(sphereGeometry, lambertMaterial);
lambertSphere.position.set(-4, 2, 0);
scene.add(lambertSphere);

const phongSphere = new THREE.Mesh(sphereGeometry, phongMaterial);
phongSphere.position.set(0, 2, 0);
scene.add(phongSphere);

const standardSphere = new THREE.Mesh(sphereGeometry, standardMaterial);
standardSphere.position.set(4, 2, 0);
scene.add(standardSphere);

const physicalSphere = new THREE.Mesh(sphereGeometry, physicalMaterial);
physicalSphere.position.set(8, 2, 0);
scene.add(physicalSphere);

// Store references for interactive controls
const spheres = [basicSphere, lambertSphere, phongSphere, standardSphere, physicalSphere];
const materials = [basicMaterial, lambertMaterial, phongMaterial, standardMaterial, physicalMaterial];
Step 5: Adding Labels
Let's add text labels so we know which material is which:
// Create text labels using canvas textures
function createTextLabel(text) {
    const canvas = document.createElement('canvas');
    const context = canvas.getContext('2d');
    canvas.width = 512;
    canvas.height = 128;

    context.fillStyle = '#000000';
    context.fillRect(0, 0, canvas.width, canvas.height);

    context.font = 'Bold 48px Arial';
    context.fillStyle = '#ffffff';
    context.textAlign = 'center';
    context.fillText(text, canvas.width / 2, canvas.height / 2 + 16);

    const texture = new THREE.CanvasTexture(canvas);
    const spriteMaterial = new THREE.SpriteMaterial({ map: texture });
    const sprite = new THREE.Sprite(spriteMaterial);
    sprite.scale.set(4, 1, 1);

    return sprite;
}

// Add labels below each sphere
const labels = [
    { text: 'Basic', position: [-8, 0, 0] },
    { text: 'Lambert', position: [-4, 0, 0] },
    { text: 'Phong', position: [0, 0, 0] },
    { text: 'Standard', position: [4, 0, 0] },
    { text: 'Physical', position: [8, 0, 0] }
];

labels.forEach(label => {
    const sprite = createTextLabel(label.text);
    sprite.position.set(label.position[0], label.position[1], label.position[2]);
    scene.add(sprite);
});
Step 6: Interactive Controls
Now let's add interactivity so we can adjust material properties in real-time!
// Get control elements
const metalnessSlider = document.getElementById('metalness');
const roughnessSlider = document.getElementById('roughness');
const opacitySlider = document.getElementById('opacity');
const wireframeBtn = document.getElementById('toggleWireframe');
const emissiveBtn = document.getElementById('toggleEmissive');

const metalnessValue = document.getElementById('metalnessValue');
const roughnessValue = document.getElementById('roughnessValue');
const opacityValue = document.getElementById('opacityValue');

// Metalness control (only affects Standard and Physical materials)
metalnessSlider.addEventListener('input', (e) => {
    const value = parseFloat(e.target.value);
    metalnessValue.textContent = value.toFixed(1);

    // Only Standard and Physical materials have metalness
    standardMaterial.metalness = value;
    physicalMaterial.metalness = value;
});

// Roughness control (only affects Standard and Physical materials)
roughnessSlider.addEventListener('input', (e) => {
    const value = parseFloat(e.target.value);
    roughnessValue.textContent = value.toFixed(1);

    standardMaterial.roughness = value;
    physicalMaterial.roughness = value;
});

// Opacity control (affects all materials)
opacitySlider.addEventListener('input', (e) => {
    const value = parseFloat(e.target.value);
    opacityValue.textContent = value.toFixed(1);

    // Enable transparency and set opacity for all materials
    materials.forEach(material => {
        material.transparent = value < 1.0;
        material.opacity = value;
    });
});

// Wireframe toggle
let wireframeEnabled = false;
wireframeBtn.addEventListener('click', () => {
    wireframeEnabled = !wireframeEnabled;
    materials.forEach(material => {
        material.wireframe = wireframeEnabled;
    });
});

// Emissive (glow) toggle
let emissiveEnabled = false;
emissiveBtn.addEventListener('click', () => {
    emissiveEnabled = !emissiveEnabled;

    // Basic material doesn't have emissive property
    lambertMaterial.emissive.setHex(emissiveEnabled ? 0x002222 : 0x000000);
    phongMaterial.emissive.setHex(emissiveEnabled ? 0x222200 : 0x000000);
    standardMaterial.emissive.setHex(emissiveEnabled ? 0x002200 : 0x000000);
    physicalMaterial.emissive.setHex(emissiveEnabled ? 0x220022 : 0x000000);
});
Step 7: Renderer Setup
// Create renderer
const renderer = new THREE.WebGLRenderer({
    canvas: canvas,
    antialias: true
});
renderer.setPixelRatio(window.devicePixelRatio);
renderer.setSize(window.innerWidth, window.innerHeight);
Step 8: Animation Loop
// Animation loop - rotate spheres and animate lights
function animate() {
    requestAnimationFrame(animate);

    const time = Date.now() * 0.001; // Convert to seconds

    // Rotate all spheres on Y axis
    spheres.forEach(sphere => {
        sphere.rotation.y = time * 0.5;
        sphere.rotation.x = Math.sin(time * 0.3) * 0.2;
    });

    // Animate point lights in circles
    pointLight.position.x = Math.sin(time) * 8;
    pointLight.position.z = Math.cos(time) * 8;

    pointLight2.position.x = Math.sin(time + Math.PI) * 8;
    pointLight2.position.z = Math.cos(time + Math.PI) * 8;

    renderer.render(scene, camera);
}

animate();

// Handle window resize
window.addEventListener('resize', () => {
    camera.aspect = window.innerWidth / window.innerHeight;
    camera.updateProjectionMatrix();
    renderer.setSize(window.innerWidth, window.innerHeight);
});
Complete Code
Here's everything together:
import * as THREE from "three";

const canvas = document.getElementById("canvas");

// Scene setup
const scene = new THREE.Scene();
scene.background = new THREE.Color(0x1a1a2e);

// Camera setup
const camera = new THREE.PerspectiveCamera(
    75,
    window.innerWidth / window.innerHeight,
    0.1,
    1000
);
camera.position.set(0, 0, 15);
camera.lookAt(0, 0, 0);

// Lighting
const ambientLight = new THREE.AmbientLight(0xffffff, 0.3);
scene.add(ambientLight);

const directionalLight = new THREE.DirectionalLight(0xffffff, 1);
directionalLight.position.set(5, 5, 5);
scene.add(directionalLight);

const pointLight = new THREE.PointLight(0xff00ff, 1);
pointLight.position.set(-5, 3, 5);
scene.add(pointLight);

const pointLight2 = new THREE.PointLight(0x00ffff, 0.8);
pointLight2.position.set(5, -3, 5);
scene.add(pointLight2);

// Materials
const basicMaterial = new THREE.MeshBasicMaterial({
    color: 0xff6b6b,
    wireframe: false
});

const lambertMaterial = new THREE.MeshLambertMaterial({
    color: 0x4ecdc4,
    emissive: 0x000000,
    wireframe: false
});

const phongMaterial = new THREE.MeshPhongMaterial({
    color: 0xffe66d,
    shininess: 100,
    specular: 0xffffff,
    emissive: 0x000000,
    wireframe: false
});

const standardMaterial = new THREE.MeshStandardMaterial({
    color: 0xa8e6cf,
    metalness: 0.5,
    roughness: 0.5,
    emissive: 0x000000,
    wireframe: false
});

const physicalMaterial = new THREE.MeshPhysicalMaterial({
    color: 0xffa8e8,
    metalness: 0.8,
    roughness: 0.2,
    clearcoat: 1.0,
    clearcoatRoughness: 0.1,
    reflectivity: 1.0,
    emissive: 0x000000,
    wireframe: false
});

// Create spheres
const sphereGeometry = new THREE.SphereGeometry(1.5, 64, 64);

const basicSphere = new THREE.Mesh(sphereGeometry, basicMaterial);
basicSphere.position.set(-8, 2, 0);
scene.add(basicSphere);

const lambertSphere = new THREE.Mesh(sphereGeometry, lambertMaterial);
lambertSphere.position.set(-4, 2, 0);
scene.add(lambertSphere);

const phongSphere = new THREE.Mesh(sphereGeometry, phongMaterial);
phongSphere.position.set(0, 2, 0);
scene.add(phongSphere);

const standardSphere = new THREE.Mesh(sphereGeometry, standardMaterial);
standardSphere.position.set(4, 2, 0);
scene.add(standardSphere);

const physicalSphere = new THREE.Mesh(sphereGeometry, physicalMaterial);
physicalSphere.position.set(8, 2, 0);
scene.add(physicalSphere);

const spheres = [basicSphere, lambertSphere, phongSphere, standardSphere, physicalSphere];
const materials = [basicMaterial, lambertMaterial, phongMaterial, standardMaterial, physicalMaterial];

// Create labels
function createTextLabel(text) {
    const canvas = document.createElement('canvas');
    const context = canvas.getContext('2d');
    canvas.width = 512;
    canvas.height = 128;

    context.fillStyle = '#000000';
    context.fillRect(0, 0, canvas.width, canvas.height);

    context.font = 'Bold 48px Arial';
    context.fillStyle = '#ffffff';
    context.textAlign = 'center';
    context.fillText(text, canvas.width / 2, canvas.height / 2 + 16);

    const texture = new THREE.CanvasTexture(canvas);
    const spriteMaterial = new THREE.SpriteMaterial({ map: texture });
    const sprite = new THREE.Sprite(spriteMaterial);
    sprite.scale.set(4, 1, 1);

    return sprite;
}

const labels = [
    { text: 'Basic', position: [-8, 0, 0] },
    { text: 'Lambert', position: [-4, 0, 0] },
    { text: 'Phong', position: [0, 0, 0] },
    { text: 'Standard', position: [4, 0, 0] },
    { text: 'Physical', position: [8, 0, 0] }
];

labels.forEach(label => {
    const sprite = createTextLabel(label.text);
    sprite.position.set(label.position[0], label.position[1], label.position[2]);
    scene.add(sprite);
});

// Interactive controls
const metalnessSlider = document.getElementById('metalness');
const roughnessSlider = document.getElementById('roughness');
const opacitySlider = document.getElementById('opacity');
const wireframeBtn = document.getElementById('toggleWireframe');
const emissiveBtn = document.getElementById('toggleEmissive');

const metalnessValue = document.getElementById('metalnessValue');
const roughnessValue = document.getElementById('roughnessValue');
const opacityValue = document.getElementById('opacityValue');

metalnessSlider.addEventListener('input', (e) => {
    const value = parseFloat(e.target.value);
    metalnessValue.textContent = value.toFixed(1);
    standardMaterial.metalness = value;
    physicalMaterial.metalness = value;
});

roughnessSlider.addEventListener('input', (e) => {
    const value = parseFloat(e.target.value);
    roughnessValue.textContent = value.toFixed(1);
    standardMaterial.roughness = value;
    physicalMaterial.roughness = value;
});

opacitySlider.addEventListener('input', (e) => {
    const value = parseFloat(e.target.value);
    opacityValue.textContent = value.toFixed(1);
    materials.forEach(material => {
        material.transparent = value < 1.0;
        material.opacity = value;
    });
});

let wireframeEnabled = false;
wireframeBtn.addEventListener('click', () => {
    wireframeEnabled = !wireframeEnabled;
    materials.forEach(material => {
        material.wireframe = wireframeEnabled;
    });
});

let emissiveEnabled = false;
emissiveBtn.addEventListener('click', () => {
    emissiveEnabled = !emissiveEnabled;
    lambertMaterial.emissive.setHex(emissiveEnabled ? 0x002222 : 0x000000);
    phongMaterial.emissive.setHex(emissiveEnabled ? 0x222200 : 0x000000);
    standardMaterial.emissive.setHex(emissiveEnabled ? 0x002200 : 0x000000);
    physicalMaterial.emissive.setHex(emissiveEnabled ? 0x220022 : 0x000000);
});

// Renderer
const renderer = new THREE.WebGLRenderer({
    canvas: canvas,
    antialias: true
});
renderer.setPixelRatio(window.devicePixelRatio);
renderer.setSize(window.innerWidth, window.innerHeight);

// Animation loop
function animate() {
    requestAnimationFrame(animate);

    const time = Date.now() * 0.001;

    spheres.forEach(sphere => {
        sphere.rotation.y = time * 0.5;
        sphere.rotation.x = Math.sin(time * 0.3) * 0.2;
    });

    pointLight.position.x = Math.sin(time) * 8;
    pointLight.position.z = Math.cos(time) * 8;

    pointLight2.position.x = Math.sin(time + Math.PI) * 8;
    pointLight2.position.z = Math.cos(time + Math.PI) * 8;

    renderer.render(scene, camera);
}

animate();

window.addEventListener('resize', () => {
    camera.aspect = window.innerWidth / window.innerHeight;
    camera.updateProjectionMatrix();
    renderer.setSize(window.innerWidth, window.innerHeight);
});
When to Use Each Material
MeshBasicMaterial
Performance: ⚡⚡⚡⚡⚡ (Fastest)
When to use:
UI elements that should always be visible
Backgrounds or sky boxes
Debug visualizations
Objects that shouldn't react to lights
Performance-critical applications with many objects
Pros: No lighting calculations, always renders fast
Cons: Looks flat, no depth or realism
MeshLambertMaterial
Performance: ⚡⚡⚡⚡ (Fast)
When to use:
Matte, non-shiny surfaces
Paper, cardboard, unfinished wood
Fabric, cloth materials
Chalk, matte paint
Mobile applications (good performance)
Pros: Good performance, realistic for matte surfaces
Cons: No specular highlights (can't make shiny things)
MeshPhongMaterial
Performance: ⚡⚡⚡ (Medium)
When to use:
Shiny plastics
Glossy paint
Polished wood
Ceramic surfaces
When you need visible light reflections
Pros: Good specular highlights, proven technique
Cons: Not physically accurate, being replaced by Standard material
MeshStandardMaterial
Performance: ⚡⚡ (Slower)
When to use:
Modern, realistic rendering
Metals (using metalness)
Most general-purpose 3D objects
When you want physically accurate materials
Production-quality projects
Pros: Physically accurate (PBR), versatile, industry standard
Cons: More expensive than Basic/Lambert/Phong
MeshPhysicalMaterial
Performance: ⚡ (Slowest)
When to use:
Car paint with clear coat
Gems and jewellery
Glass and transparent materials
High-end product visualization
When you need the absolute best quality
Pros: Most realistic, has advanced features (clear coat, transmission)
Cons: Most expensive performance-wise, overkill for many use cases
Performance Comparison
From fastest to slowest:
MeshBasicMaterial - No lighting calculations
MeshLambertMaterial - Simple lighting (diffuse only)
MeshPhongMaterial - Lighting + specular highlights
MeshStandardMaterial - Full PBR calculations
MeshPhysicalMaterial - PBR + advanced effects
Pro tip: Use the cheapest material that gives you the look you need! Don't use Physical material if Standard looks good enough.
What I Learned
1. Materials Define Appearance
While geometry defines shape, materials define how that shape looks - the colour, shininess, transparency, and how it reacts to light. They're equally important!
2. Lighting Dependencies Matter
Basic material = No lights needed (always visible)
Lambert, Phong, Standard, Physical = Need lights to be visible This is crucial when debugging - if your objects are black, check your lights!
3. PBR is the Modern Standard
The metalness/roughness workflow (Standard and Physical materials) is what modern games and applications use. It's more intuitive than the old specular workflow.
4. Metalness vs Roughness
Understanding these two properties unlocks realistic materials:
Metalness: Is it metal or not? (Usually 0 or 1, rarely in between)
Roughness: How polished is the surface? (0 = mirror, 1 = matte)
5. Performance vs Quality Trade-off
You can have 1000 objects with Basic material or 100 with Physical material. Choose based on your needs:
Mobile/many objects = Basic or Lambert
Desktop/quality matters = Standard or Physical
6. Emissive Adds Depth
Adding a subtle emissive glow (same colour as the object, very low intensity) can make materials look more alive without affecting performance much.
7. Transparency Requires Planning
When using opacity, you must set transparent: true first. Also, transparent objects can have sorting issues when overlapping - Three.js renders them back-to-front.
8. Wireframe Mode is Essential for Learning
Toggle wireframe mode to see the actual geometry structure. It's incredibly useful for understanding how shapes are built and debugging performance issues.
Common Material Patterns
Here are some material configurations I've found useful:
Polished Metal
new THREE.MeshStandardMaterial({
    color: 0xaaaaaa,
    metalness: 1.0,
    roughness: 0.2
});
Matte Plastic
new THREE.MeshStandardMaterial({
    color: 0x2194ce,
    metalness: 0.0,
    roughness: 0.8
});
Glass
new THREE.MeshPhysicalMaterial({
    color: 0xffffff,
    metalness: 0.0,
    roughness: 0.0,
    transmission: 1.0,
    transparent: true
});
Glowing Object
new THREE.MeshStandardMaterial({
    color: 0x00ff00,
    emissive: 0x00ff00,
    emissiveIntensity: 0.5
});
Key takeaways:
Basic = fast but flat
Lambert = matte surfaces
Phong = shiny surfaces
Standard = modern PBR (use this most)
Physical = premium quality when you need it
The interactive controls in this demo really helped me understand how metalness, roughness, and other properties affect the final look. I recommend building this yourself and playing with the sliders!
Try experimenting with:
Different metalness/roughness combinations
Adding emissive glows in different colors
Creating transparent materials
Mixing materials on different objects
Adjusting lighting to see how materials react
Understanding materials is essential for creating visually appealing 3D experiences. Now I can make things look like metal, plastic, glass, or anything in between!
Happy rendering. 🎨